

Rainwater
Independent Civils Solutions stock a full and extensive rainwater drainage system this includes:
- Half round gutter & fittings 112mm in White, Black & Anthracite
- Square gutter & fittings 114mm in White, Black & Anthracite
- Deepflow Gutter 120mm in White, Black & Anthracite
- Klassic Ogee 135mm in White & Black
- Kommercial half round gutter 150mm in Black
- Square & Round downpipe in White, Black & Anthracite
Soffit & fascia
Enhance the Aesthetics and Durability of Your Roofline and Windows with PVC-UE Cellular Trims.
Are you looking for top-quality solutions to protect and enhance your roofline and windows? Look no further than our range of PVC-UE cellular trims. Designed to offer exceptional durability and aesthetic appeal, our trims are the perfect choice for both residential and commercial properties.
What sets our PVC-UE cellular trims apart is their unique composition. Crafted from high-quality PVC-U (unplasticized polyvinyl chloride), these trims are engineered to withstand harsh weather conditions, UV radiation, and general wear and tear. With our trims installed, you can bid farewell to worries about rotting, warping, or cracking.
Our extensive selection of PVC-UE cellular trims includes a wide range of profiles and sizes, ensuring that you’ll find the perfect fit for your roofline and windows. Whether you’re replacing existing trims or starting a new installation project, our versatile trims offer a seamless finish and effortless integration with your property’s architectural style.
The benefits of choosing our PVC-UE cellular trims don’t stop at durability and functionality. With their smooth, clean lines and crisp finishes, our trims effortlessly enhance the visual appeal of your roofline and windows. Available in various colours, including classic white and a range of complementary shades, our trims can be customized to match your property’s unique aesthetics.
Installing our PVC-UE cellular trims is a breeze, thanks to their lightweight construction and user-friendly design. You can count on a hassle-free installation process, saving you time and effort. Additionally, our trims require minimal maintenance, allowing you to enjoy long-lasting beauty without the need for frequent upkeep.
At ICS, we take pride in delivering exceptional customer service and top-quality products. Our team of experts is always ready to assist you in selecting the right PVC-UE cellular trims for your specific requirements. We are dedicated to ensuring your complete satisfaction, from product selection to after-sales support.
Upgrade the look and performance of your roofline and windows with our PVC-UE cellular trims. Contact us today to explore our extensive range and start your journey towards a more beautiful and resilient property
- Full Stock
- Full Support
- Sustainable
- Innovative
Step by Step Installation Guide - RAINWATER INSTALLATION GUIDE - Fascia
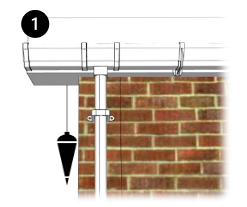
Step 1
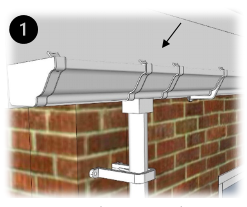
- To ensure the running outlet is positioned accurately, hold a plumb line against the fascia, directly over the gully.
- Mark the running outlet position
using a pencil. - Then fit the outlet no more than 50mm under the roof level.
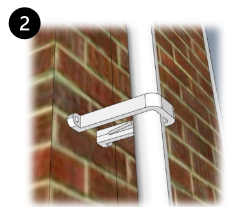
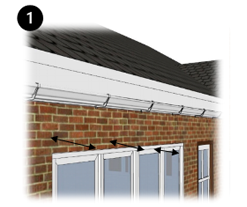
Step 2
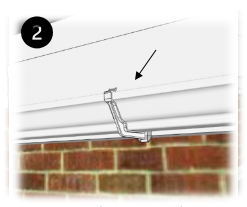
- Fit the fascia bracket at the
opposite site of the running
outlet, just below the top of the fascia board.
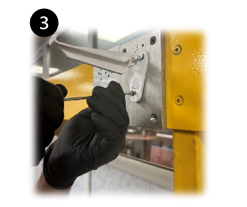
Step 3
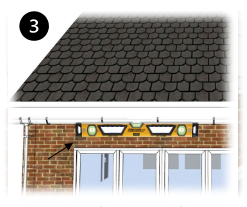
- Use a spirit level to check the fall towards the running outlet.
- The recommended is 1.350.
Step 4
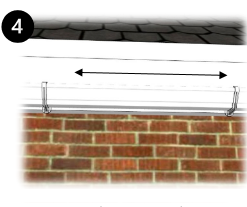
- Mark the precise position of the fascia brackets, keeping them a maximum of 150mm from any angle or stop end and not further than 1000mm apart (400mm in areas with high snowfall).
Step 5
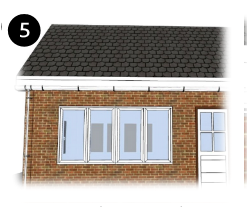
- Fix all fascia brackets to the fascia board.
- Please use a minimum of 2 screws 25mm x 5mm brass or zinc round head screws for high loading applications please use 3 screws.
Step 6
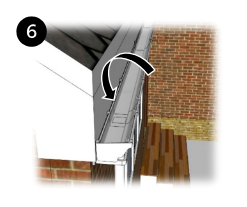
- Using the back to front method, start to fit the lengths of the gutter.
- The next length of gutter should be inserted into the union bracket that is fitted at the other end of the first length and screwed into the fascia.
- Keep joining lengths.
- Ensure that every joint aligns with the insertion depth marked on the fittings.
Step 7
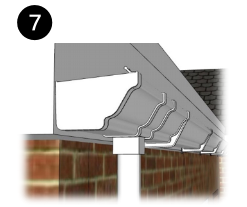
- Fit an external stop end at one or both sides of the gutter
Remember
You should only be testing the gutter with the fittings ONLY when they are installed.
Do not test the system until the job is complete
Step by Step Installation Guide - RAINWATER INSTALLATION GUIDE - Downpipe
Step 1
- From the running outlet, mark a vertical line, using a plumb line, from the outlet to the drain.
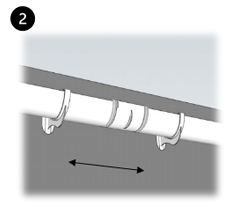
Step 2
- Mark the fixing holes with a
pen, using a downpipe clip.
Space the clips no more than1.8m apart.
Step 3
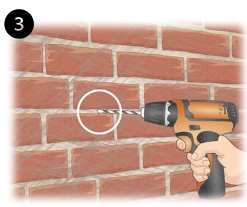
- Drill the holes for the pipe clips.
Step 4
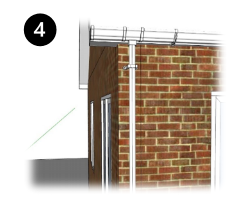
- Install the downpipe, from top to botom. Fit a pipe clip on top of the joint.
- Leave a 10mm gap between the end of the pipe and the botom of the pipe socket to allow for expansion.
Step 5
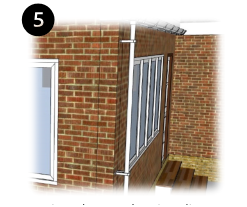
- Fit and screw the pipe clips to the down pipe.
Step 6
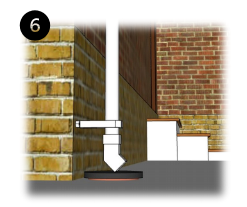
- Fit the shoe at the bottom of the downpipe so that it directs water into the drain, if required.
Remember
We recommend using extra lubricant in case the seals have run dry for easier fit. Lubricant must be used on all shaped and large gutter systems
Step by Step Installation Guide - RAINWATER INSTALLATION GUIDE - Shaped Gutters
Step 1
- Please ensure that fascia brackets are fitted at 800mm for Klassic and Krown Ogee systems.
Step 2
- For Deep Flow Kommercial and Kommercial Xtra, fascia brackets are fitted at 600mm centres.
Step 3
- Top hung fascia brackets must be fitted at no more than 400mm centres.
Step 4
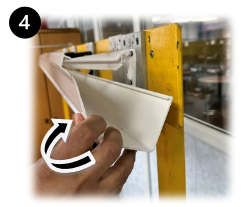
- On top hung fascia brackets, the gutter must be inserted using the front to back method, otherwise you could damage the top hung fascia bracket and the gutter.
Step 5
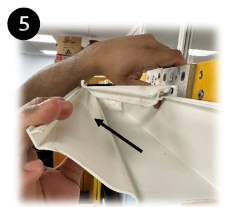
- For the ease of cleaning, the top hung fascia brackets are designed to be easily dismantled. To do this you simply unclip the top hung fascia bracket by pulling the gutter away from the bracket using the front to back method
Remember
All gutters must be fitted to gutter insertion point as marked in the fittings. This allows the gutters to expand and contract in summer and winter. If not fitted to the insertion point, this can result in leaks due to the gutter shrinking and making no contact
Remember
All rainwater systems must not be stored in direct sunlight, as this can cause distortion and warping, and must not be stored in vans due to excessive heat in the summer.
Please ensure all products are stored in the shade and taken out of the protective wrapping to avoid excess heat built-up.
In the winter all products must be stored indoors and away from vans due to extreme temperature movements as this can cause the gutter and fittings to go brittle and results in gutter fascia brackets snapping and gutters shattering when you try to cut them. We recommend that all our rainwater systems should be stored at room temperature for 24 hours before fitting.